Capture guides
How to Put a Website Screenshot in a Browser Frame (Automate the Capture)
July 4, 2026 · 7 min read · Grabbit Team
To put a website screenshot in a browser frame, capture the screenshot and then wrap it in a browser-window graphic. The framing is the quick part. The slow part, the part makers actually complain about, is the capture: open the page, screenshot it, crop it, drop it into Figma, pick a frame, nudge the padding, export. Do that every time the page changes and it stops being a five-minute task.
This guide shows how to automate the capture step with one API call, then drop the real screenshot into a browser frame you control, whether that frame is a CSS component, a mockup tool, or a PSD template. Grabbit handles the render; you keep whatever framing you like.
What a browser mockup actually is
A browser mockup is a screenshot of your page shown inside a stylized browser window, with the address bar, tabs, and the three traffic-light buttons drawn around it. You see them everywhere makers post product visuals: landing page hero sections, Product Hunt launches, Twitter and X threads, app-store shots. A bare screenshot looks flat and unfinished; the same screenshot inside a browser frame reads as a real, shipped product.
Two parts make up every mockup:
- The frame. The browser chrome around the content. This is pure decoration, a static graphic, and it never changes between mockups.
- The content. A screenshot of your actual page. This is the part that changes every time you redesign, ship a feature, or want a fresh shot.
Searching "browser mockup" mostly turns up the frame: Figma community files, PSD templates, stock vectors. Those solve the decoration. They do nothing for the part that actually takes your time, which is producing a clean, current screenshot of the page to put inside.
The slow part is the capture, not the frame
If you make product visuals regularly, the workflow is familiar and tedious: take a screenshot, open the image in Figma, drop it onto a browser-frame component, adjust the padding so it sits right, then export. The frame you set up once. The capture you redo every single time the page changes, and manual capture is where the minutes go, especially if you need the shot at a consistent size across a set of pages.
So the win is not a better frame. It is removing the manual capture. If the screenshot arrives automatically at a fixed viewport, the mockup regenerates from a URL and the Figma round-trip disappears.
Automate the capture with one API call
A screenshot API renders your page in a real browser and hands back a hosted image, so you never manually screenshot and crop again. Send the URL, get back an image:
curl https://api.grabbit.live/v1/grabs \
-H "Authorization: Bearer sk_live_..." \
-H "Content-Type: application/json" \
-d '{
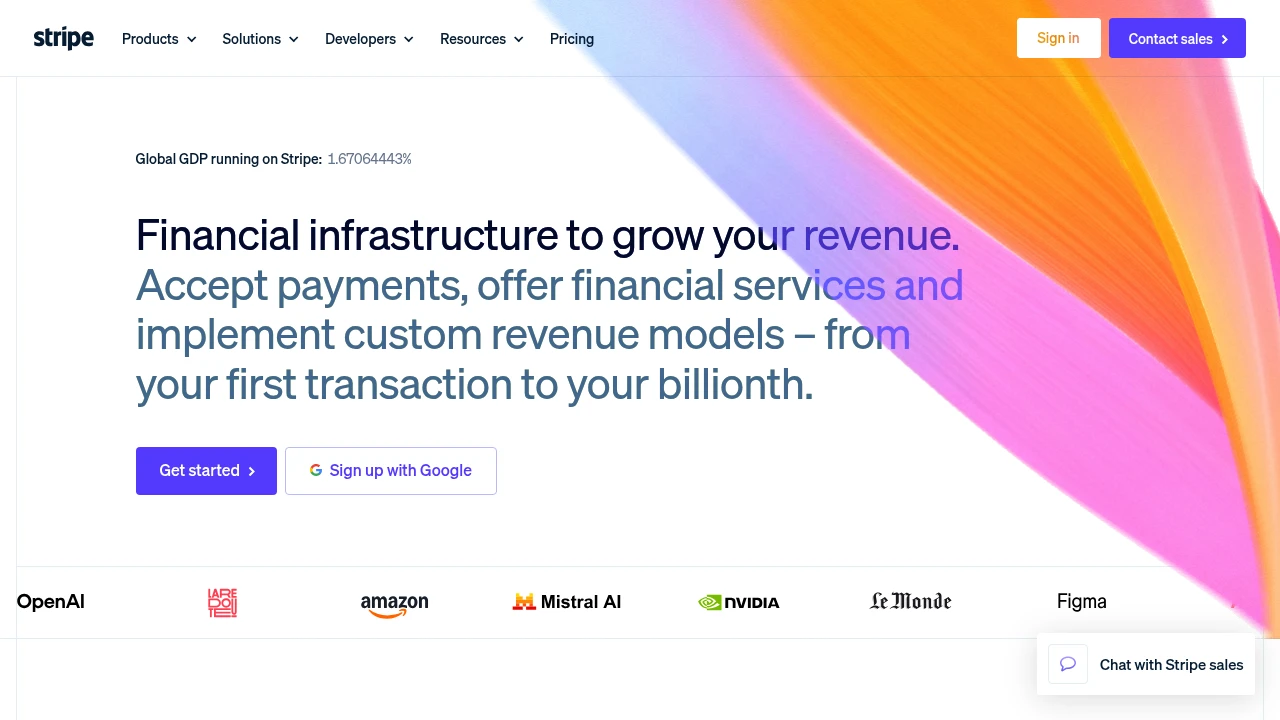
"url": "https://stripe.com",
"width": 1280,
"height": 720,
"format": "webp"
}'
width of 1280 pins the desktop layout, so the mockup shows the site the way visitors see it rather than its mobile breakpoint. height of 720 gives a clean above-the-fold crop that sits naturally inside a browser frame. format of webp keeps the file small, which matters when a landing page loads several framed shots. The response includes an image_url pointing at the stored capture; that URL is what you put inside the frame.
A few options are worth knowing for mockups:
- Want the whole page instead of the top crop? Set
"full_page": trueand dropheight. - Page loads content after the first paint? Add
"delay_ms": 800so lazy images and animations settle before the capture. - Want to frame just one region, like a hero or a pricing card, instead of the full window? Pass
"selector": "#hero"and only that element is captured. See how to screenshot a specific element for that path.
That is the whole capture step. No Chromium to install, no screenshot to crop by hand.
Drop the screenshot into a CSS browser frame (no Figma)
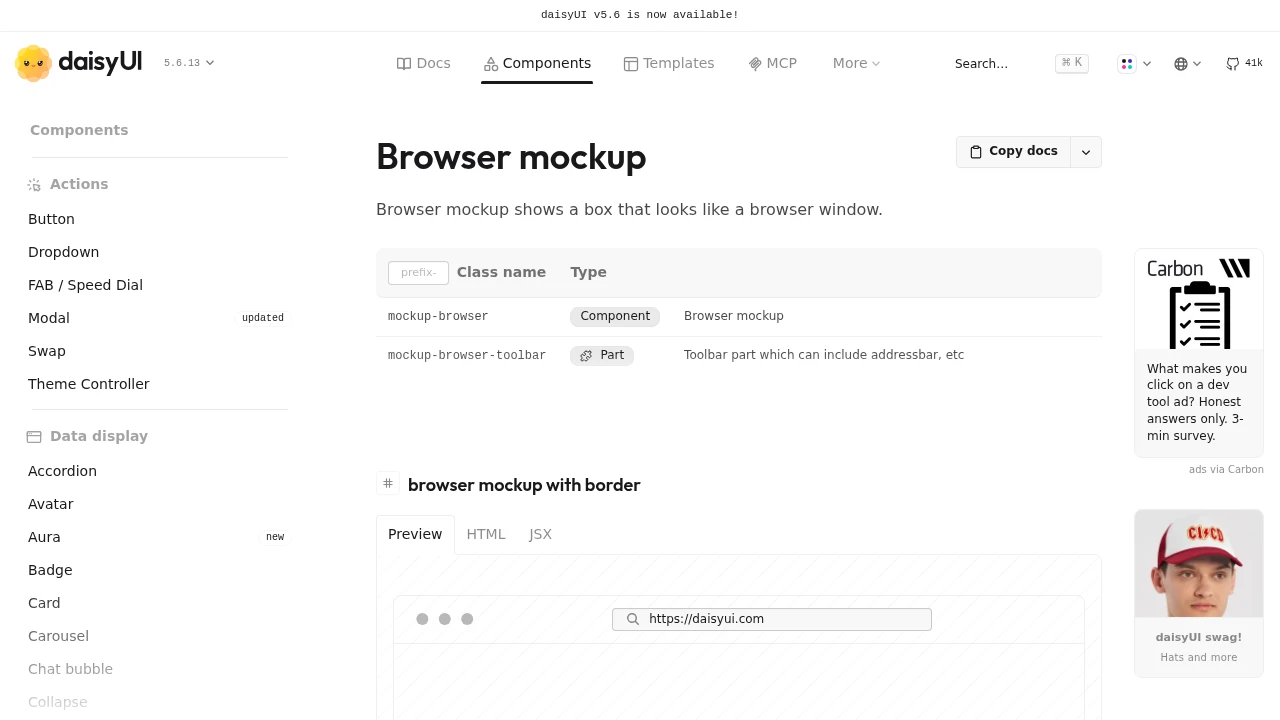
For the frame itself, you do not need a design tool. A CSS browser frame renders the window chrome in pure markup, and you put the captured screenshot inside it. daisyUI (a Tailwind component library) ships a mockup-browser class that does exactly this:
<div class="mockup-browser border border-base-300 w-full">
  <div class="mockup-browser-toolbar">
    <div class="input">https://stripe.com</div>
  </div>
  <img src="https://cdn.grabbit.live/grabs/grb_01jx....webp" alt="Stripe home page" />
</div>
The mockup-browser element draws the traffic-light buttons and the toolbar; the input shows the URL; the <img> is your real screenshot from the API. Swap the src for a fresh capture and the mockup updates with no file to open. If you are not on Tailwind, the same idea works with a plain <div> styled as a window bar plus your image below it.
Because both halves are now code, the whole mockup regenerates from a URL: recapture the page, point the <img> at the new image, done. This is the same "host it, then screenshot it" pattern used to generate a website preview image from a URL, just with a browser frame wrapped around the result.
When you still want a design tool or PSD frame
CSS frames are fastest, but they are not the only option, and the automation still helps. If you prefer a polished 3D frame, a specific browser skin, or a mockup app's export, the split stays the same: the API produces the screenshot, the tool produces the frame.
- Mockup apps and generators let you upload an image and drop it into a device or browser scene. Feed them the API's captured image instead of a hand-taken screenshot, so the input is always current and consistently sized.
- Figma and PSD templates give you full control over the frame's look. Place the captured screenshot into the template's image slot; you have skipped the manual capture-and-crop, which was the slow part, and kept the design polish.
In every case Grabbit owns the capture only. It renders the page and returns an image; it does not draw the device or browser frame. That division is the point: automate the tedious capture, then frame it however you like.
Batch a whole set of mockups
Making shots for several pages, a feature tour, a set of landing variants, is the same request in a loop. There is no separate batch endpoint:
- List the page URLs you want framed.
- Call the API once per URL with the same width, height, and format so every shot is consistent.
- Store each returned
image_urlkeyed by its page. - Render each one inside your frame of choice.
Because the API runs the browser pool for you, ten mockups is the same code as one. If you are building this around a list of pages, how to screenshot a website from a URL covers the request and the loop in more depth.
Putting it together
A browser mockup is a screenshot inside a browser frame. The frame is decoration you set up once; the capture is the work, and it is the part worth automating. Send the URL to a screenshot API, get back a hosted image at a fixed desktop size, and drop it into a CSS frame, a mockup tool, or a PSD template. The five-minute Figma round-trip becomes one API call you can repeat any time the page changes.
For the full set of capture options (viewport, format, full-page, selector, delay), see screenshots as a service. To capture just one region of the page for a tighter frame, see how to screenshot a specific element.
FAQ
- How do I put a screenshot in a browser mockup?
- Two steps: capture the screenshot, then wrap it in a frame. The slow part is the capture, so automate it: send the page URL to a screenshot API and get back a hosted image. Then drop that image into a browser frame, which can be a CSS or Tailwind component (like daisyUI's mockup-browser), a mockup tool, or a PSD template. Automating the capture step turns a five-minute Figma round-trip into a single API call you can repeat any time the page changes.
- Is there a way to automate browser mockups?
- Yes, at least the capture half, which is the part that eats your time. A screenshot API renders the page in a real browser and returns a hosted image, so you never manually screenshot and crop again. The frame itself is static markup or a template, so once the screenshot is automated the whole mockup regenerates from a URL. Grabbit renders the capture; it does not draw the device frame, so pair it with a CSS frame or any mockup tool for the chrome.
- What is a browser mockup?
- A browser mockup is an image of a web page shown inside a stylized browser window, with the address bar, tabs, and traffic-light buttons drawn around it. Makers use them for product screenshots on landing pages, Product Hunt, Twitter, and app stores because a bare screenshot looks flat while a framed one reads as a real product. The frame is decoration; the content inside it is a screenshot of your actual page.
- How do I make a browser mockup without Figma?
- Skip the design tool entirely for the frame by using a CSS browser frame such as daisyUI's mockup-browser class, which renders the window chrome in pure markup. Put a real screenshot of your page inside it, captured with a screenshot API so you are not manually screenshotting and cropping. That gives you a framed product shot from a URL with no Figma file to open, and it regenerates whenever the page changes.
- What size should the screenshot in a browser mockup be?
- Capture at a desktop viewport width so the page renders the layout visitors actually see. 1280px wide is a safe default; pair it with a 720px height for a clean above-the-fold crop, or use full_page for the whole document. Then display it scaled down inside the frame. Capturing wide and downscaling in CSS keeps text legible, which beats rendering at a tiny viewport where the mobile layout kicks in.
Capture any website with one API call
Get a free test key and capture your first screenshot in two minutes.
Written by
Grabbit Team
Screenshots as a service
The team behind Grabbit, the screenshot API for developers and AI agents. We write about web capture, rendering, and automating screenshots at scale.
Keep reading
How to Generate a Website Preview Image from a URL
Turn any URL into a website preview image with one API call. How to render a real screenshot of a page, what size to capture, how it differs from a social link preview, and how to cache the image.
Jun 26, 2026 · 6 min read
How to Screenshot a Website from a URL (No Browser Needed)
Skip the headless browser setup. Learn the three ways to capture a screenshot from a URL, and when a screenshot API beats Puppeteer or Playwright for production workloads.
Jun 15, 2026 · 5 min read

How to Screenshot a Specific Element on a Page (With a CSS Selector)
Capture just one element from a web page instead of the whole thing. How element screenshots work in the browser, in code, and with a CSS selector over an API, and when each one fits.
Jun 27, 2026 · 6 min read