Capture guides
How to Screenshot a Specific Element on a Page (With a CSS Selector)
June 27, 2026 · 6 min read · Grabbit Team

To screenshot a specific element instead of the whole page, target it with a CSS selector and capture only its bounding box. You can do this three ways: manually in the browser's DevTools, in code with a headless browser, or over an API by sending the page URL and the selector. Which one fits depends on whether it is a one-off, whether you control the page, and how many elements you need to capture.
This guide covers all three, the difference between a true element screenshot and a client-side <div> re-render, and why element capture is often the right call for monitoring a single component.
The manual way: DevTools node screenshot
For a quick one-off, the browser already does this. In Chrome:
- Right-click the element and choose Inspect to select its node in the Elements panel.
- Open the Command Menu with Cmd/Ctrl + Shift + P.
- Type
screenshotand choose Capture node screenshot.
Chrome saves a PNG cropped to that element. Firefox has the same feature: in the Inspector, right-click a node and pick Screenshot Node. This is perfect when you need one image once. It does not help when you need the same element from many pages, on a schedule, or from a server, which is where the next two paths come in.
The code way: capture an element's bounding box
Every headless browser can screenshot a single element. The shape in Puppeteer:
// DIY: find the element, screenshot only its box
const browser = await puppeteer.launch();
const page = await browser.newPage();
await page.goto(url, { waitUntil: 'networkidle2' });
const el = await page.$('#pricing-table');
await el.evaluate((node) => node.scrollIntoView());
await el.screenshot({ path: 'element.png' });
await browser.close();
Playwright is page.locator('#pricing-table').screenshot(). Selenium 4 added it too: find the element, then call getScreenshotAs (Java) or .screenshot() (Python) on the element itself. See how to take screenshots in Selenium for the full element-capture example there.
Two things bite people:
- Scroll into view. If the element is below the fold, the capture can come back clipped or blank. Scroll it into view first.
- Wait for it to render. If the element is populated by JavaScript after load, the selector resolves before the content paints. Wait for the element, or add a short delay, before capturing.
This is the right path when the page is yours and you are already running a browser. The cost is the same as any DIY screenshot setup: you own the browser pool, the scaling, and the storage.
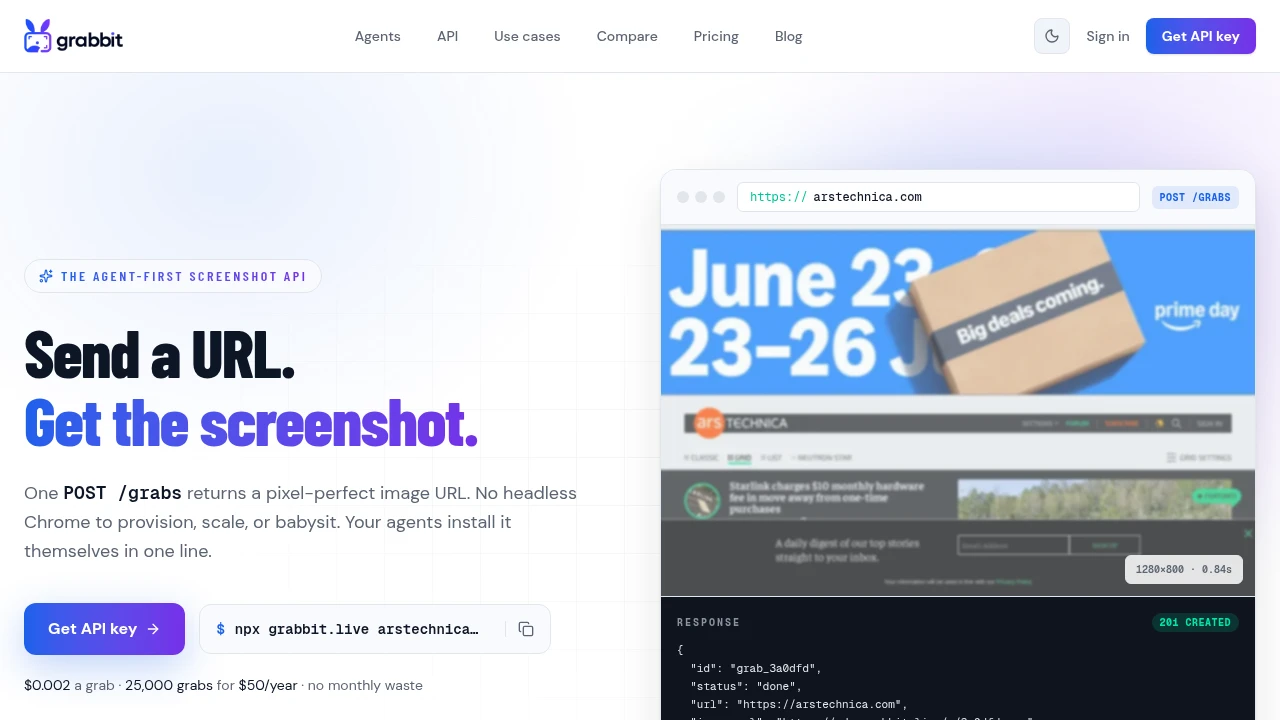
The API way: send a URL and a selector
When you want one element from a page you do not control, or the same element across many URLs, sending the work to a screenshot API is the shortest path. You pass the page URL and a CSS selector, and you get back an image cropped to that element. No browser to run, no scroll-and-wait logic to maintain:
curl https://api.grabbit.live/v1/grabs \
  -H "Authorization: Bearer sk_live_..." \
  -H "Content-Type: application/json" \
  -d '{
    "url": "https://stripe.com/pricing",
    "selector": ".PricingTable",
    "format": "webp",
    "delay_ms": 800
  }'
The API renders the real page in a browser, finds the element matching selector, and returns an image_url pointing at a hosted capture of just that element. delay_ms of 800 gives content that loads after first paint time to settle before the capture. format of webp keeps the file small.
A few notes on the parameters:
selectortakes any CSS selector: an id (#hero), a class (.PricingTable), or a more specific path. If it matches multiple elements, the first match is captured.widthstill sets the viewport the page renders at (320 to 1920), which decides whether the element renders in its desktop or mobile layout before it is cropped. Leave it at the default 1280 for a desktop render.- Skip
full_pagehere. Element capture and full-page capture are different jobs:selectorcrops to one element,full_pagecaptures the entire document. If you want the whole page instead, see how to take a full-page screenshot.
Element screenshot vs a client-side div re-render
There is a popular fourth approach that looks like an element screenshot but is not one: html2canvas and similar libraries. These run in the user's browser and redraw a DOM node onto a <canvas>. That is a re-render of the DOM, not a capture of what the browser actually painted, so it has real limits:
- It can miss or blank out cross-origin images the canvas cannot read.
- Complex CSS (filters, some gradients, transforms, custom fonts) often renders differently from the real page.
- It only works on a page already loaded in a browser you control, so it is no help for capturing an element from an external URL.
For a faithful image of an element as a browser renders it, you want a real render: headless Chrome in code, or a screenshot API. The client-side canvas trick is fine for capturing something inside your own running app (a generated chart, a receipt) where pixel-perfect fidelity to the live page does not matter.
When to capture one element instead of the whole page
Element capture is not just a smaller screenshot. For some jobs it is the better one:
- Component monitoring. Watching a single pricing table, status banner, or hero for changes is cleaner against just that element. A full-page diff lights up every time an unrelated ad or footer shifts; an element capture only changes when the thing you care about does. This pairs naturally with visual regression testing.
- Embedding a specific piece. Pulling one card, chart, or quote out of a page to show elsewhere is exactly an element crop.
- Stable captures across pages. Capturing
.product-cardacross a catalog gives you uniform images without per-page cropping math.
Putting it together
To screenshot a specific element: pick it with a CSS selector, then capture only its bounding box. For a one-off, DevTools' node screenshot is instant. In your own app with a browser already running, screenshot the element in Puppeteer, Playwright, or Selenium. For an element from a URL you do not control, or the same element across many pages, send the URL and selector to an API and get back a cropped image with no browser to run.
For every capture option (viewport, format, full-page, selector, delay) see the screenshot API. To capture whole pages from URLs, see how to screenshot a website from a URL.
FAQ
- How do I take a screenshot of a specific element?
- Pick the element with a CSS selector, then capture only its bounding box instead of the whole page. In Chrome DevTools you inspect the element, open the Command Menu (Cmd/Ctrl + Shift + P), and run 'Capture node screenshot'. In code you scroll the element into view and screenshot its bounding box with Puppeteer, Playwright, or Selenium. Over an API you send the page URL plus the selector and get back a cropped image of just that element.
- How do I screenshot a specific element from a URL without opening the page?
- Send the URL and a CSS selector to a screenshot API. The API renders the page in a real browser, finds the element matching the selector, and returns an image cropped to that element. You never open the page or run a browser yourself. This is the fastest path when you want one element from a page you do not control, or when you are capturing the same element across many URLs on a schedule.
- How do I take a screenshot of a WebElement in Selenium?
- Selenium 4 added element-level capture: find the element with a locator, then call its screenshot method (getScreenshotAs in Java, .screenshot() in Python) to save just that element. On older Selenium you screenshot the full page and crop to the element's location and size. The element must be scrolled into view first, or the capture is clipped.
- How do I screenshot a div with JavaScript?
- Two approaches. Client-side, a library like html2canvas redraws a DOM node onto a canvas in the browser, which is a re-render rather than a true screenshot and can miss cross-origin images or complex CSS. Server-side, headless Chrome (Puppeteer or Playwright) or a screenshot API renders the real page and captures the element's bounding box, which matches what a browser actually paints.
- What is a node screenshot in Chrome DevTools?
- A node screenshot captures a single DOM node (element) rather than the viewport or the full page. Inspect the element, open the Command Menu with Cmd/Ctrl + Shift + P, type 'screenshot', and choose 'Capture node screenshot'. Chrome saves a PNG cropped to that element. It is a manual, one-off tool; for automation you use a selector in code or over an API.
Capture any website with one API call
Get a free test key and capture your first screenshot in two minutes.
Written by
Grabbit Team
Screenshots as a service
The team behind Grabbit, the screenshot API for developers and AI agents. We write about web capture, rendering, and automating screenshots at scale.
Keep reading
How to Screenshot a Website from a URL (No Browser Needed)
Skip the headless browser setup. Learn the three ways to capture a screenshot from a URL, and when a screenshot API beats Puppeteer or Playwright for production workloads.
Jun 15, 2026 · 5 min read
How to Take a Full-Page Screenshot (Every Method That Works in 2026)
How to take a full-page screenshot on Chrome, Firefox, Edge, Windows, Mac, iPhone, and Android, plus how to capture full pages automatically with an API.
Jun 10, 2026 · 4 min read
How to Take Screenshots in Selenium (Full Page and Element)
How to capture screenshots in Selenium WebDriver: the viewport default, the full-page workarounds Selenium does not handle natively, single elements, and when a screenshot API is less work.
Jun 16, 2026 · 4 min read